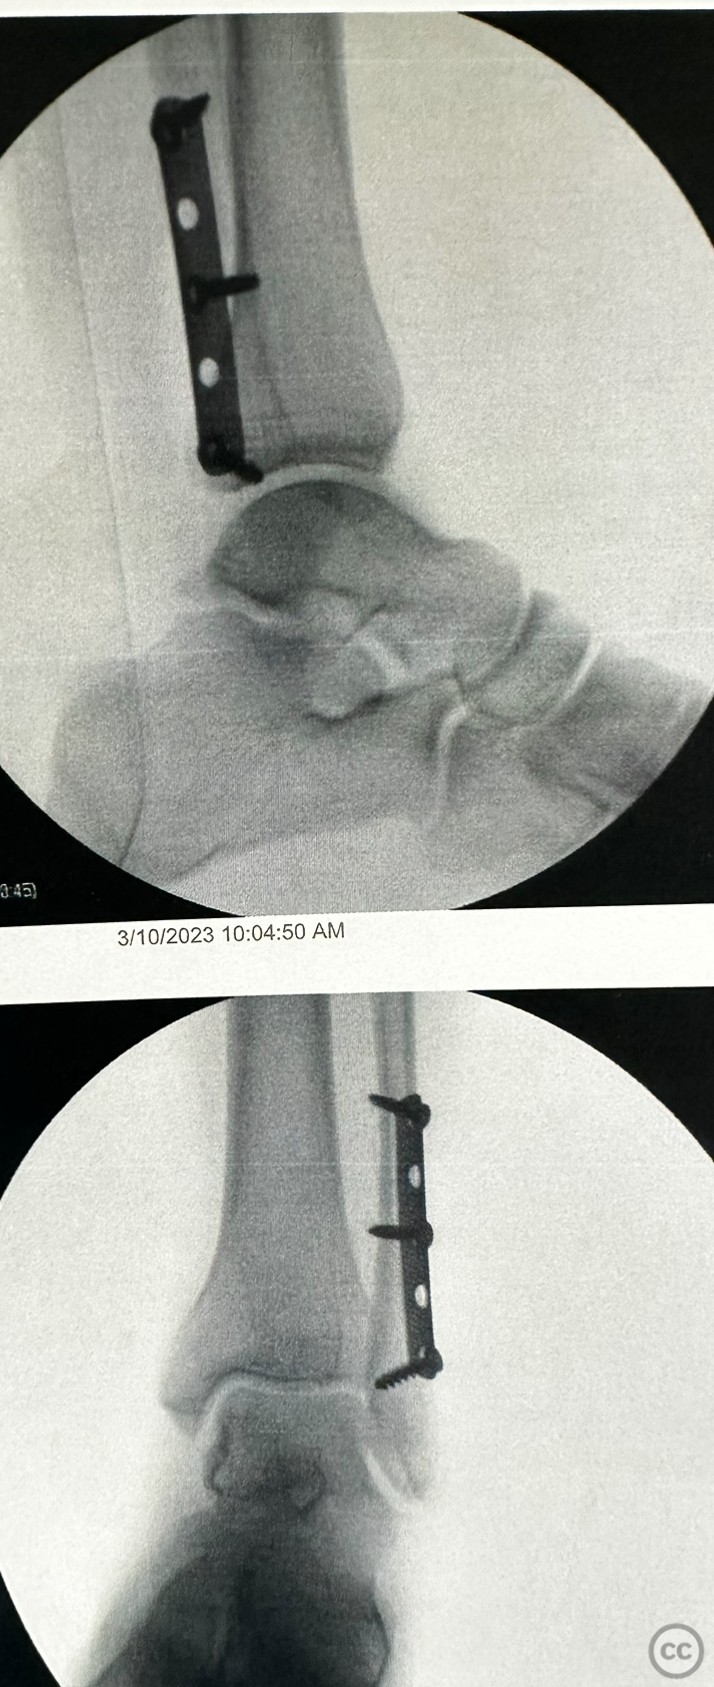
Antiglide 1/3rd tubular construct
Score and Comment on this Case
Clinical Details
Clinical and radiological findings: Like the thin twig of a tree, stretched too far by a ravenous wind, the distal fibula had fractured. It wasn't a subtle, forgiving crack that might mend itself given time and rest, but a Weber B fracture. It was a division, a chasm, carving its way through the vulnerable bone as easily as a river might etch its bed through soft loam. Upon investigation, this fracture revealed itself to be even more insidious than first thought. A gravity and direct stress test were performed, much like an old-time general surveying a field of battle. The results were not encouraging. The fracture line stretched, opened, expanded under the force, like a yawning maw eager to consume all that surrounded it. The medial clear space, that critical area nestled amongst ligament and bone scathed open. The syndesmosis was safe island amidst a storm-ravaged sea, it stood in stark contrast to the chaos surrounding it. It was a slender hope, but hope nonetheless, offering a whisper of assurance that healing was indeed possible. The family was presented with options, paths splitting off like branches of a great tree, each with its own possible outcomes and consequences. Non-operative and operative solutions danced around each other, both vying for consideration, weaving a complex narrative of decisions and implications. The non-operative path was akin to the gentle song of a lullaby, whispering promises of natural healing, of allowing the body to perform its own delicate ballet of recovery. Yet it was a slow dance, a path that demanded patience and fortitude, casting a long shadow of uncertainty. On the other side, the operative route gleamed, surgical steel and precision echoing the bold, decisive strokes of a seasoned warrior. It was a path that promised swift action, a speedy return to the rhythm of life, and most importantly, it granted the victim immediate, weight-bearing freedom as tolerated. And thus, like a species evolving in the merciless throes of survival, the choice evolved, pushed forward by the urgency of the situation. It became clear, as if through a dawn breaking over a battle-weary field, that surgery was the chosen path. The decision was made, and the course was set. The warrior's path was chosen, and it was surgery that would lead the way back to a life unrestricted by injury.
Preoperative Plan
Planning remarks: 1. Patient Evaluation: The first step is to assess the patient's medical history, including any previous ankle injuries, underlying medical conditions, allergies, and medications. A physical examination is performed to evaluate the ankle's range of motion, stability, and neurovascular status. 2. Radiographic Evaluation: X-rays are taken to determine the type and severity of the ankle fracture. These images help identify the specific fracture pattern, displacement, and any associated injuries. CT scans or MRI may be used in complex cases to provide more detailed information. 3. Surgical Decision-Making: Based on the patient's evaluation and the fracture characteristics, the surgeon determines the need for surgical intervention. If it is decided that an anti-glide plate is the appropriate fixation method, the surgical plan moves forward. 4. Anesthesia Consultation: The patient is evaluated by an anesthesiologist to assess their suitability for anesthesia and to discuss the anesthesia options, such as general anesthesia or regional anesthesia (e.g., spinal or epidural). 5. Preoperative Instructions: The patient is provided with instructions regarding fasting guidelines before surgery, medication adjustments, and any other specific preparations required, such as stopping certain medications or arranging transportation for the day of surgery. 6. Preoperative Testing: Depending on the patient's age and medical history, additional tests such as blood work, ECG, or chest X-ray may be ordered to ensure the patient is in optimal condition for surgery. 7. Surgical Consent: The surgeon discusses the procedure, its potential risks and benefits, and obtains the patient's informed consent for surgery. 8. Preoperative Marking: The surgeon may mark the surgical site on the patient's ankle to ensure accuracy and proper alignment during the procedure. 9. Preoperative Antibiotics: In some cases, the patient may receive a preoperative dose of antibiotics to prevent infection. 10. Preoperative Preparations: On the day of surgery, the patient is admitted to the hospital or surgical center. They are provided with a hospital gown and prepared for surgery, which may involve shaving the surgical site and cleaning the area with an antiseptic solution. 11. Ankle Immobilization: If necessary, a splint or cast may be applied to immobilize the ankle before surgery to provide temporary stability and reduce pain. 12. Final Preoperative Check: Before entering the operating room, the surgical team verifies the patient's identity, the procedure to be performed, and ensures all necessary equipment and implants are available. Please note that this description provides a general overview of the preoperative planning process for ankle fracture fixation with an anti-glide plate. The specifics may vary depending on the individual patient's case and the preferences of the surgical team. It is important to consult with a qualified healthcare professional for personalized advice and guidance.
Surgical Discussion
Patient positioning: Supine
Anatomical surgical approach: Posteriolateral
Operative remarks:Here's a step-by-step description of the placement of an anti-glide plate for a fibula fracture:
1. Anesthesia: The patient is placed under the appropriate anesthesia, which may be general anesthesia or regional anesthesia (such as a nerve block) based on the surgeon's and anesthesiologist's decision.
2. Patient Positioning: The patient is positioned supine on the operating table, and the affected leg is appropriately prepped and draped to maintain a sterile environment.
3. Incision and Exposure: The surgeon makes an incision over the appropriate anatomical landmarks near the fractured area on the lateral side of the fibula. The length and location of the incision depend on the fracture pattern and specific patient factors. Soft tissues are carefully dissected to expose the fractured site.
4. Fracture Reduction: The surgeon carefully manipulates the fractured bone fragments to achieve anatomical alignment and restore proper length, rotation, and alignment of the fibula. This step may involve using manual manipulation, traction, or specific instruments.
5. Temporary Fixation: To maintain reduction while preparing for plate fixation, temporary fixation methods may be employed. This can include the use of Kirschner wires (K-wires) or clamps to hold the fracture fragments in place temporarily.
6. Plate Selection and Preparation: Based on the fracture location, size, and patient anatomy, an appropriate size and shape of an anti-glide plate is chosen. The plate is typically made of titanium or stainless steel. The plate is contoured to match the curvature of the fibula using specialized instruments.
7. Plate Placement: The contoured anti-glide plate is carefully positioned along the lateral aspect of the fibula to provide stability and prevent distal fragment displacement. The plate is secured to the bone using screws that are inserted through the plate holes into the fibula fragments. The number and placement of screws depend on the fracture pattern and fixation requirements.
8. Screw Insertion: The surgeon drills pilot holes through the plate into the fibula using a drill guide to ensure accurate screw placement. Then, screws of appropriate length and diameter are inserted into the bone through the plate, compressing the fracture fragments together and securing them in place.
9. Final Assessment and Adjustments: Once the plate and screws are in place, the surgeon verifies the reduction and fixation quality through imaging or direct visualization. If needed, adjustments are made to ensure proper alignment and stability of the fractured fibula.
10. Wound Closure: The incision is carefully closed in layers using sutures or surgical staples. A sterile dressing is applied over the incision site.
11. Postoperative Care: After the surgery, the patient is transferred to the recovery area. Pain management, wound care instructions, and rehabilitation plans are provided. The patient may require a cast, splint, or walking boot to immobilize the ankle during the initial healing phase..
Postoperative protocol: After placement of an anti-glide plate for a stable fibula fracture, the postoperative protocol typically involves a gradual progression toward weight-bearing as tolerated. Here's a detailed outline of a postoperative protocol for such cases: 1. Immediate Postoperative Phase (Day 0 to Day 1): - The patient is monitored closely in the recovery area or hospital ward. - Pain management is initiated, which may involve oral or intravenous medications as prescribed. - The surgical dressing is inspected for any signs of bleeding, excessive swelling, or infection. - Neurovascular status of the foot is monitored regularly to ensure adequate circulation and nerve function. - The patient may be allowed to perform gentle ankle range of motion exercises as guided by the surgeon or physical therapist. 2. Early Mobilization Phase (Day 1 to Week 2): - The patient is typically discharged from the hospital or surgical facility. - Weight-bearing restrictions are initially implemented, and the patient may be provided with crutches or a walker for support. - The patient is instructed to keep the operated leg elevated when resting to reduce swelling. - Physical therapy may begin to focus on gentle strengthening exercises, mobility exercises, and gait training. - X-rays may be taken during this phase to assess fracture healing and hardware stability. 3. Protected Weight-Bearing Phase (Week 2 to Week 6): - Weight-bearing as tolerated is gradually allowed, with progression guided by the surgeon or physical therapist. - The patient may transition from crutches or walker to partial weight-bearing using a walking boot or cast. - Physical therapy continues, emphasizing range of motion exercises, strengthening exercises, and balance training. - Follow-up appointments with the surgeon are scheduled to monitor the healing process and assess the need for any adjustments. 4. Progressive Weight-Bearing Phase (Week 6 to Week 12): - The patient's weight-bearing is increased gradually, aiming for full weight-bearing without assistance. - Continued physical therapy focuses on further strengthening, balance, and functional activities. - The patient may begin transitioning from a walking boot or cast to a regular shoe, as advised by the surgeon. - X-rays may be taken periodically to monitor fracture healing and hardware integrity. 5. Functional Recovery Phase (Week 12 and onward): - The patient is encouraged to gradually resume normal daily activities and work toward full functional recovery. - Physical therapy continues, addressing any residual strength deficits, improving proprioception, and restoring normal gait patterns. - Follow-up appointments with the surgeon are scheduled to evaluate the final outcome and determine if any further treatment or therapy is necessary.
Orthopaedic implants used: Synthes 1/3rd tubular
Search for Related Literature


Industry Sponsership
contact us for advertising opportunities
Article viewed 1182 times
28 Jun 2023
Add to Bookmarks
Full Citation
Cite this article:
David Bennett. (2023). Antiglide 1/3rd tubular construct. Journal of Orthopaedic Surgery and Traumatology. Case Report 34994425 Published Online Jun 28 2023.